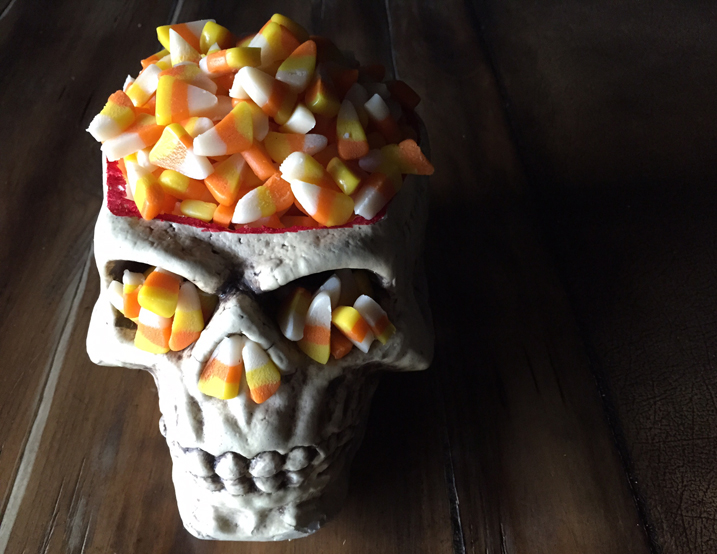
Homemade Candy Corn
ACTIVE TIME: 45 minutes
TOTAL TIME: 2 hours
Yield: 60 to 80 pieces
Why in the world would you make candy corn from scratch? Three reasons:1. Unlike manufactured versions of the Halloween sweet, homemade candy corn delivers a singularly satisfying sensation, a one-two punch of flavor and texture.2. Remember when you asked me that about marshmallows? Exactly.3. Because you can. And it’s a lot simpler than you think.Why put nonfat dry milk in candy? Besides flavorful milk sugars, dry milk contains a good dose of milk proteins that can also absorb liquid and coagulate into a kind of gel. This happens in the presence of enzymes and acids such as those found, albeit in small amounts, in corn syrup. Both U.S. standard and metric measurements are listed, but for consistent results, go metric.This recipe first appeared in Season 14 of Good Eats.
Read More
Read Less
Software
- 1 1/4 cups
confectioners' sugar - 6 1/2 teaspoons nonfat dry milk
- 1/4 teaspoon
kosher salt - 1/2 cup sugar
- 1/3 cup light corn syrup
- 2 1/2 tablespoons water
- 2 tablespoons unsalted butter, at room temperature
- 1/2 teaspoon
vanilla extract - 2 or 3 drops each yellow and orange gel paste food coloring
Specialized Hardware
ACTIVE TIME: 45 minutes
TOTAL TIME: 2 hours
Yield: 60 to 80 pieces
Procedure
- Combine the confectioners' sugar, dry milk, and salt in a food processor. Pulse until the mixture is smooth and well combined, 4 to 5 pulses. Set aside.
- Combine the granulated sugar, corn syrup, and water in a 2-quart pot. Place over medium heat, cover, and cook for 4 minutes. Add the butter and cook the sugar syrup until it registers 240ºF on a digital instant-read thermometer. Kill the heat and remove the thermometer.
- Add the vanilla and the dry mixture and stir continuously with a silicone spatula until well combined. Pour onto a half-sheet pan lined with a silicone baking mat or parchment paper. Cool until the mixture is cool enough to handle, 10 to 15 minutes.
- Divide the dough into 3 equal pieces. Add 2 or 3 drops of yellow food coloring to one piece and knead until the color is consistent throughout. Add 2 or 3 drops of orange to the second piece and knead until the color is consistent throughout. Leave the third piece white.
- Roll each piece of dough into a strand about 18 inches long. Cut each strand in half and roll each piece into a strand that is about 1/2 inch thick and 22 inches long.
- Lay the strands side by side (yellow, orange, then white) and press them together using your fingers. Cut into 4-inch pieces. Then, using a ruler or bench scraper, press each log into a long wedge, keeping the yellow section wide and making the white part come to a tip — this color arrangement is classic but if you want to rebel, change up the combo.
- Use a wire butter slicer, thin knife, or pizza cutter to cut each wedge into individual candies. Lay the candies on a piece of parchment until dry, at least 1 hour. Store in an airtight container with parchment between each layer.
Alton independently selects these products—if you buy from one of our links, we may earn a commission from the brand.

RELATED RECIPES

Sign Up for the Newsletter