Schnitzel Kiev
The problem with traditional Chicken Kiev is the rolling, which is a pain, and honestly, who wants to cut into a chicken rollup only to get squirted with butter? For my money, the way to make Chicken Kiev is to treat it like a schnitzel, which is basically a flattened piece of meat coated in bread crumbs and pan fried. Here's how I do it. This recipe first appeared in Season 2 of Good Eats: Reloaded.
ACTIVE TIME: 1 hour
TOTAL TIME: 2 hours 40 minutes
Yield: 4 servings
Software
- 3 tablespoons chopped fresh tarragon
- 2 tablespoons chopped fresh parsley
- 16 tablespoons (2 sticks) unsalted butter, cold, chopped into small pieces
- 2 1/2 teaspoons kosher salt, divided
- 1/2 teaspoon freshly ground black pepper
- 4 (5- to 6-ounce) boneless skinless chicken thighs
- 1/2 cup all-purpose flour
- 2 large eggs, beaten with 1 tablespoon water
- 2 cups panko breadcrumbs
- 2 to 4 cups 100% olive oil, not extra-virgin, for frying
- 1 lemon, for serving
Specialized Hardware
- Large cast-iron skillet or 11-inch saute pan
- 3 pie or loaf pans
Procedure
- Combine the herbs in a small bowl, setting aside 1 tablespoon for garnishing before service.
- Load the butter in your stand mixer’s work bowl, and with the paddle attachment on medium-low speed, beat until the butter softens and lightens in color, stopping occasionally to scrape down the sides of the bowl — 5 to 7 minutes total.
Add half of the chopped herbs and 1/2 teaspoon of the salt, then beat on low speed until incorporated — 2 minutes. Scoop the butter onto a sheet of parchment paper, fold the paper over the top of the butter, then, while holding the paper, push the straight edge of a sheet pan forward against the butter so that it forms a smooth cylinder that’s about 6inches long. RefrigerateButter can be stored up to 1 week wrapped in plastic wrap. until firm — 2 hours. - Set a wire cooling rack inside a sheet pan and have it standing by. Clear enough room on the bottom section of your refrigerator to hold the pan/rack combo if possible.
Place a long piece of plastic wrap (about 18 inches) on the counter and sprinkle an area the size of a chicken thigh with some of the remaining salt and pepper. Place a thigh on top, season the other side, then fold the plastic over so that the thigh is sandwiched between the layers. Spritz with water to provide some lubrication, then pound gentlyTake your time and let the weight of the tool do the work. with a smooth-sided meat mallet until the meat is approximately 1/4-inch thick. Peel back the plastic and sprinkle on a pinch of herbs, flip, and repeat with the herbs, then continue pounding until meat is around 1/8-inch thick. Then peel off the top plastic and flip out onto the cooling rack. Remove the rest of the plastic, then repeat with the remainder of the thighs. - Refrigerate the thighs for 30 minutes or, if you can’t manage the space, on the counter in a cool spot out of direct sunlight.
- Meanwhile, heat the oven to 250°F and position a second wire rack/pan combo on the middle rack. If you don’t have another cooling rack, place a pan under one of the oven’s racks to catch crumbs and just rest the cooked meat directly on the rack.
- Line up three pie pans or, better yet, loaf pans. In the first place the flour, in the second the egg and water mixture, and in the third the panko. When the chicken has rested 30 minutes, coat each piece first in flour (being careful to shake off as much excess as possible), then the egg, (I count to 3 after each dip to allow excess to drain), then the panko, turning to dredge thoroughly. Return each piece to the rack and rest at room temp for 15 minutes.
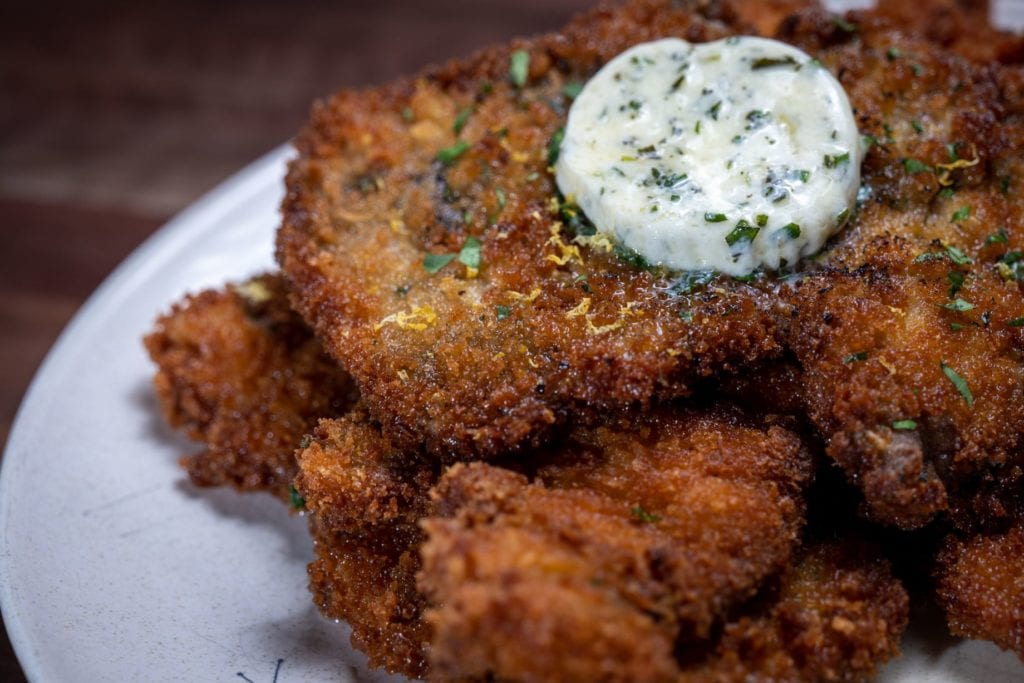
- Meanwhile, slice four 1/4-inch-thick slices of the herb butter and set aside for serving.
- When the chicken has rested (and the dredge has set), heat 1/2 inch of olive oil in a large cast-iron skillet or an 11-inch, straight-sided sauté pan over medium-high heat until the oil hits 375°F. Fry the thighs, one at a time, until deeply golden brown on both sides and the internal temp hits 165°F — 1 to 2 minutes per side. As each piece is finished, move to the oven to keep warm. Throughout the process, check the temp of the oil and adjust the heat to maintain 375°F. Typically, I have to turn down the heat a couple of times during the process so as to not overheat.
- Top the chicken with the remaining herbs and a medallion (or two) of the butter. Zest the lemon over the top, then slice into wedges, and serve on the side.