
SEARCH


Candied Orange Peel 2.0
ACTIVE TIME: 25 minutes
TOTAL TIME: 1 hour 40 minutes
Yield: 40 (3-inch) pieces
Crunchy, tangy candy made from fresh orange peel.So, when I included a procedure for candied orange peel to be used in the Amaranth Wafer recipe in my book, EveryDayCook, I didn’t have a lot of space and so the procedure had to be abbreviated…a lot. And it wasn’t given nearly the attention it was due. Some of you have had trouble with it, and once I went back and gave it a fresh look, I can see why. It’s badly written…simple as that. Truth is, candied orange peel is one of my very favorite candies, not only as an ingredient, but just as candy I like to munch. What’s more, I love making it. So, it (not to mention you) deserve a full explanation of the procedure. Here's a tip: I save any residual syrup and surplus sugar that drain off the cooling orange peels and return it to the pan. Add a cup of water, cover, and simmer for 10 minutes to create an orange-flavored sugar syrup that can be added to tea and cocktails. Sealed in a jar and refrigerated, it’ll keep for months.This recipe first appeared in EveryDayCook.
Read More
Read Less
Software
- 4 ripe oranges, like Navel
- 2 cups sugar
- 4 cups water
Specialized Hardware
ACTIVE TIME: 25 minutes
TOTAL TIME: 1 hour 40 minutes
Yield: 40 (3-inch) pieces
Procedure
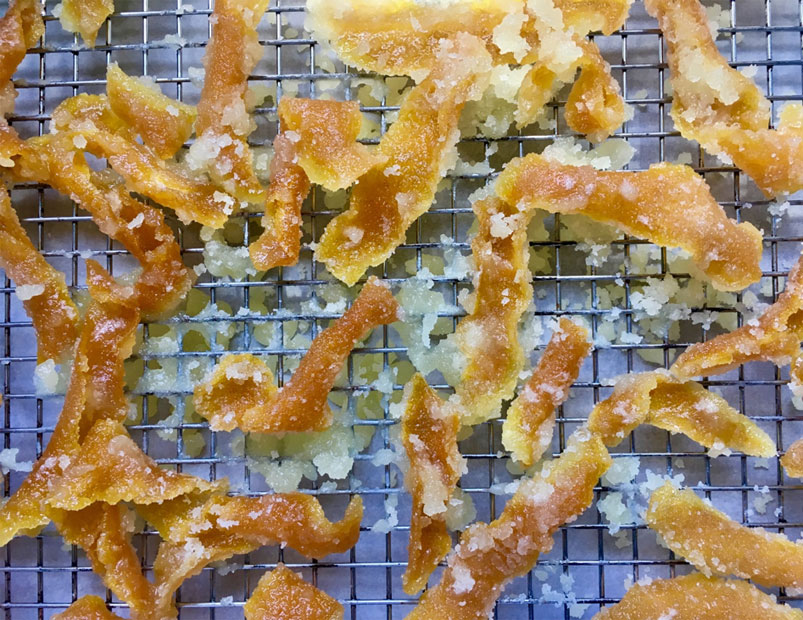
- Place a cooling rack over a sheet pan lined with parchment paper. If you don't have a sheet pan, just put the paper on the counter, but don't skip the cooling rack.
- Using a vegetable peeler, remove the outer peel of each orange, working from stem end to blossom end; think about following the longitude lines on a globe.
- Lay each piece on a cutting board, pith (the white stuff)-side up. Use a paring knife to scrape off as much of the pith as possible. Don't go crazy, but the more you get off, the less bitter it'll be.
- Place the peel strips in a medium saucier or saucepan. I use a 3-quart saucier so that the liquid will pool in the bottom as it reduces. Add two cups of water and bring to a boil over medium-high heat, then drop the heat to maintain a simmer for 15 minutes. Drain and return the peel to the pan.
- Add the sugar and the last two cups of water. Bring to a boil over medium-high heat and stir every few minutes with a silicone spatula until the sugar dissolves.
- When the syrup hits a boil, drop the heat and maintain a simmer for approximately 1 hour. Since the syrup is going to slowly concentrate, you'll need to drop the heat every now and then to just maintain that simmer. Remember, this isn't just about creating a sugar crust, it's about actually getting some of that sugar into the peel and that takes time. Stir every few minutes to help ensure equal coverage and cooking.
- After 50 minutes, a majority of the water will have evaporated and the remaining syrup will be thick and there will be a lot of bubbles. You'll know the peels are nearly done when you swipe the spatula across the bottom of the pan and you feel grit. That means the syrup is concentrated and the sugar is falling out of solution. At this point, use an instant-read thermometer to start checking the temperature.
- When the syrup hits 250ºF, immediately remove from the heat and pour the orange peels onto the cooling rack, separating and straightening the pieces as quickly as you can with the spatula or two forks. Once cool, shake off any excess sugar and cover lightly with paper towels or a clean towel overnight.
- Seal the candied peel in a glass jar and store at room temperature for up to 3 months. If making in the summer, consider adding a food-grade silica desiccant pack to the jar to absorb humidity. (Yes...the interwebs has them.)

RELATED RECIPES

Sign Up for the Newsletter


